Here is a tutorial for a simple pop-up Christmas card, based on a half A4 tent fold card blank.
There are free downloadable sheets at the end of the post.
CLICK ON IMAGES FOR A CLOSER LOOK
We've used our stamp - Hero Arts 'Leaf Flourish', stamped using VersaFine Onyx black.
EJ Craft Designs
The present is attached onto a stamped panel using small 3D foam pads and then to a silver mirror board mount using double sided tape.
The base card has been stamped again, inside, using VersFine Onyx black with a few crystal glitter highlights to finish.
The presents are attached using folded strips of card - more details below.
Here we've stamped with VersaMark and embossed with our 'Silver Dollar' embossing powder.
The presents and tag were printed onto silver metallic adhesive foil.
The make of this fab film is 'print IT'
After printing leave to dry for at least 15 minutes.
Roughly cut out the pieces you need.
Peel off the backing.
Stick them to matching colour card.
Cut out as you would normally.
- POP UP TUTORIAL -
From the downloaded sheets cut one large and one small present.
You will also need to cut a tag.
To attach the presents to the inside:
Cut two strips of card:
1) 40mm high by 100mm wide (just under 4" x 1 & 9/16")
2) 20mm high by 80mm wide (3/4" x 3 & 1/8")
Fold each in half and in half again making quarter folds.
Form the strips into cubes so the folds work in the correct direction.
Open them flat and apply tape to three of the four quarters as shown above.
Fold each strip back in half with the two sections that are taped facing you.
With the two quarters that are taped facing you, attach the large present (face up) to the large tag.
A) Attach it close to the tag fold but not covering it.
B) the untaped section is visible on the reverse
Attach the small present to the smaller tag in the same way.
Printed side facing you, attach the small present to the large present -
C) lining up the base of the tag to the base of the large present.
Before removing the double sided tape backing from your tag
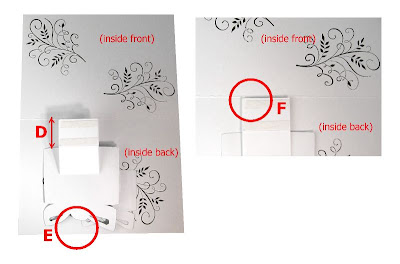
Open your card and position the presents -
line up the edge of the large present tag to the card centre fold (D & F)
Check that the top of the present doesn't run over the edge of the card (E)
If it does trim the end of the tag (F) until it fits.
Remove the tape backing and place in position.
Close the card, making sure that the presents remain in position.
Press firmly across the front of the card then open - the presents will pop up and forward.
The tag:
Cut a strip of card narrower than the tag and almost twice it's length.
Fold in half and apply double sided tape to both sides
Attach to the back of the tag.
Position and fix the tag to your card whilst the card is open.
FINISHED!
- DOWNLOAD SHEETS -Click on the images (this will open them to full size) then save.
They will need to be printed in 'Landscape'.
Have Fun!
Elaine


%20(watermarked).jpg)


So very delightful -- I found you on a "journey" through a few blogs and I am so glad to have landed here. What a wonderful Mom and Daughter team you make. Congratulations!
ReplyDeleteI'm super excited about your new blog!!!!! I'm so glad I just found it! This is so exciting and wonderful! Your Mother looks as sweet as you and you guys make such a wonderful team. I've read the blog now and can't wait for more! Thanks for sharing such awesome talent! Best, Curt
ReplyDeleteThis is great! Thanks very much and wish you a Happy New Year!
ReplyDeletebellissima questa pop-up card.E da oggi fate parte dei miei preferiti
ReplyDeleteThank you, I made some nice Christmas cards with your help... it was awesome... Merry christmas....
ReplyDeleteHi Melorin
ReplyDeletethank you for your comment - it's always wonderful to receive feedback and I'm glad the tutorial helped.
Thanks to everyone who has taken the time to leave comments, they are very much appreciated.
Merry Christmas!
Elaine x
Thank you for the great tutorial! That's exactly what I was looking for! I'll change the colours and the Christmas card will turn into a birthday one!
ReplyDelete