Wednesday, 9 December 2009

OUR FIRST AWARD!!!


A BIG thank you to the wonderful MARTHA for giving us this award - we are 'Over the Moon'!
It should be passed on to 5 others and we have listed our nominations at the end of the post.

OK, there are 35 questions to answer,
each answer must only be one single word
- DIFFICULT -
 but here goes:
(Elaine)
  1. Where is your cellphone?.......................BIN
  2. Your hair?...........................................Highlights
  3. Your Mother?......................................Tireless
  4. Your Father?........................................Patient
  5. Your favourite food?.............................Vegetarian
  6. Your dream last night?...........................Colourful
  7. Your favourite drink?.............................Bacardi&Coke
  8. Your dream/goal?..................................Fulfilment
  9. What room are you in?...........................Hall
  10. Your hobby?..........................................Craft
  11. Your fear?.............................................Spiders!!!
  12. Where do you want to be in 6 years?...........Dancing
  13. Where were you last night?......................Friends
  14. Something that you aren't?........................Wealthy
  15. Muffins?..................................................Banana
  16. Wish list item?.........................................Time
  17. Where did you grow up?.........................Yorkshire
  18. Last thing you did?...................................Webbing
  19. What are you wearing?............................Thermals
  20. Your TV?................................................Off
  21. Your pets?...............................................Noisy
  22. Friends?...................................................Fantastic
  23. Your life?.................................................MAD
  24. Your mood?.............................................Reactive
  25. Missing someone?.....................................Always
  26. Vehicle?....................................................Feet
  27. Something you're not wearing?...................Shoes
  28. Your favourite store?..................................Hardware
  29. Your favourite colour?................................Red
  30. When was the last time you laughed?..........Today
  31. Last time you cried?...................................Today
  32. Your best friend?........................................GillHBB
  33. One place that I go to over and over?..........Garden
  34. Facebook?..................................................No
  35. Favourite place to eat?.................................Informal
We would like to pass this award on to:
  • JULIA - It's always a joy to visit Julia's blog and her work is an inspiration
  • LYNNE - Gorgeous blog, gorgeous work and Lynne's use of colour is magical
  • SALLY - Sally is a mum, full time teacher and manages to fit her wonderful crafting into all of this!!!
  • MICHELLE - Michelle's work is, quite simply, stunning - I'm going to start taking exploding box lessons from her!
  • VICKI - Vicki's scrapbook pages are wonderful and packed with inventive fun
It may be that not everyone has the time to take part in awards but please visit these people - they will inspire you!

Elaine and Janet.

Thursday, 19 November 2009

Gift Box Template - 'Snowflake'

his hexagonal gift box measures 45mm high x 85mm wide
(1 3/4" high x 3 3/8"wide)
There's a free downloadable template at the end of this post.

CLICK ON IMAGES FOR A CLOSER VIEW

I used Stampin-Up card - 'Almost Amethyst' it's one of my favourite colours.
I printed directly onto the card (the template sheets are drawn in grey so the lines are not too heavy).
I cut out using a craft knife and made sure that the printed lines went to the inside of the box when gluing it together.

The stamp was a snowflake.
Stamped using VersaMark and embossed with 'Sea-foam White' powder.
I added a few crystal glitter accents and some flat backed pearls.

To finish I ran a Brilliance ink pad - 'Moonlight White' round the edges and sponged across the lid sides. 


- Hexagonal Gift Box Template -
Click on the images to open full size then save.
These sheets are set to print grey so the lines are not too prominent if you print directly onto your chosen card stock.
They appear very faint but will print OK.

- Box & Lid Liner, Lid Mount & Gift Card -
This second sheet is optional but the liners finish the box off nicely by hiding the glue flaps inside the box and lid.


Thanks for popping by
Elaine

Monday, 16 November 2009

Pop Up Christmas Card - 'Snowmen'

This card was made using exactly the same process explained in our earlier post - 'Pop Up Card Tutorial'.

CLICK ON IMAGES FOR A CLOSER VIEW
Instead of using the decoupage sheets 'Presents' I stamped and cut out two snowmen  - ('Funstamps - Snowman' wood mounted stamp).

I've had this stamp for at least a couple of years but this is the first time I've actually used it. How bad is that!


The snowmen were stamped using VersaFine Onyx Black then coloured using watercolour pencils and a blending pen.
The background is chalked then stamped over with a small snowflake stamp. I stamped in VersaMark and used 'Seafoam White' embossing powder.
To finish I added crystal glitter highlights.

I doodled the 'snow ball mountain' and the snowmen are juggling doodled snowballs mounted onto the tips of acetate strips so it looks like they're in mid air.


I wanted the second snowman to reach out from the card and his arm to be in a different position to the original stamp.
Masking off didn't work so here's what I did:

- Changing a stamped image -
1.  Stamped the snowman twice. Cut out the second - I used this later, to trace round (4).
2.  Pencilled in the shape I wanted the second snowman's body to be.
3.  Inked over the pencil, dotting inside my inked line (to match the style of the stamp's lines).
4.  Placed the cut out snowman, from earlier, where I wanted the second hand to be.
5.  Pencilled round the arm and hand.
6.  Worked over the pencil lines as before.
7.   Finally I cut out the amended snowman.
8.  The variation on the original stamp.


Hope you have a go and thanks for visiting!
X


Tuesday, 10 November 2009

Free Download - Xmas Card Pop Up Tutorial

Here is a tutorial for a simple pop-up Christmas card, based on a half A4 tent fold card blank.
There are free downloadable sheets at the end of the post.

CLICK ON IMAGES FOR A CLOSER LOOK
We've used our stamp - Hero Arts 'Leaf Flourish', stamped using VersaFine Onyx black.
EJ Craft Designs
The present is attached  onto a stamped panel using small 3D foam pads and then to a silver mirror board mount using double sided tape.

The base card has been stamped again, inside, using VersFine Onyx black with a few crystal glitter highlights to finish.


The presents are attached using folded strips of card - more details below.


Here we've stamped with VersaMark and embossed with our 'Silver Dollar' embossing powder.


The presents and tag were printed onto silver metallic adhesive foil.
The make of this fab film is 'print IT'


After printing leave to dry for at least 15 minutes.
Roughly cut out the pieces you need.
Peel off the backing.
Stick them to matching colour card.
Cut out as you would normally.


- POP UP TUTORIAL -
From the downloaded sheets cut one large and one small present.
You will also need to cut a tag.

To attach the presents to the inside:
Cut two strips of card:
1) 40mm high by 100mm wide (just under 4" x 1 & 9/16")
2) 20mm high by 80mm wide (3/4" x 3 & 1/8")


Fold each in half and in half again making quarter folds.
Form the strips into cubes so the folds work in the correct direction.
Open them flat and apply tape to three of the four quarters as shown above.


Fold each strip back in half with the two sections that are taped facing you.


With the two quarters that are taped facing you, attach the large present (face up) to the large tag.
A) Attach it close to the tag fold but not covering it.
B) the untaped section is visible on the reverse
Attach the small present to the smaller tag in the same way.


Printed side facing you, attach the small present to the large present -
C) lining up the base of the tag to the base of the large present.


Before removing the double sided tape backing from your tag
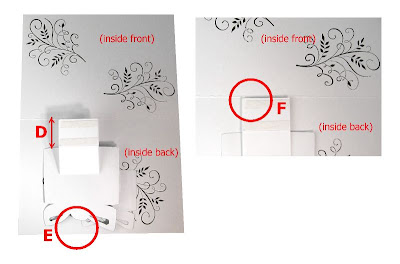
Open your card and position the presents -
line up the edge of the large present tag to the card centre fold (D & F)
Check that the top of the present doesn't run over the edge of the card (E)
If it does trim the end of the tag (F) until it fits.
Remove the tape backing and place in position.


Close the card, making sure that the presents remain in position.
Press firmly across the front of the card then open - the presents will pop up and forward.


The tag:

Cut a strip of card narrower than the tag and almost twice it's length.
Fold in half and apply double sided tape to both sides
Attach to the back of the tag.


Position and fix the tag to your card whilst the card is open.

FINISHED!


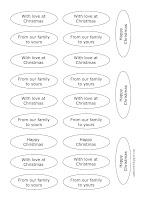
- DOWNLOAD SHEETS -Click on the images (this will open them to full size) then save.
They will need to be printed in 'Landscape'.


Have Fun!

Elaine


Friday, 30 October 2009

Free Download - Halloween Lantern

A short break from Christmas because Halloween is here!!!!
If you haven't made a pumpkin lantern yet these are the quickest, easiest lanterns you can make.
There's a free download at the end of this post.

CLICK ON IMAGES FOR A CLOSER VIEW
Print onto any colour paper - the choice is yours. Paper is better than card because it allows the light, from your candle, to shine through.
These lanterns have been printed onto UK A4 landscape.
If you have a laminator - run them through it. This will waterproof them and they will happily stand outside even if it rains.

After laminating simply roll the lantern into a tube, prick holes top, middle and bottom and fix with small brads.
If you haven't laminated you can glue or tape.

Place a night light into a glass or jam jar and pop the lantern over it.
 
They look good in daylight but they're fab when it gets dark!

Cut across the middle of the print-out and you have two shorter lanterns.

The best thing is - when Halloween's over, open the brads, and these lanterns can be stored flat in an envelope - ready for next year.


CLICK ON THE IMAGE TO OPEN IT FULL SIZE THEN SAVE

Just a few words of caution here, as with all candles, it isn't safe to leave them unsupervised, especially around children.
Adding sand or a small amount of water to the jar before inserting the candle is a good extra safety precaution.

Happy Halloween!
X

Click HERE
for Halloween Tags Project

Click HERE
for Halloween Card Project


Wednesday, 28 October 2009

Free Downloadable Decoupage Sheets - Christmas Robins

As Christmas is just around the corner here's a quick and easy Christmas card project for you. We've really enjoyed making the samples and there are two free downloadable sheets at the end of this post.

A4 half fold card - 'from our family to yours'
The background was made using our Hero Arts 'Leaf Flourish' wood mounted stamp and VersaFine Onyx black ink.
The ribbon is 6mm wide red grosgrain (a favourite of ours).


Applying Glossy Accents to the eye gives the robin it's typical bright eyed look
These cards are very easy and quick to make and the ribbons give them a real touch of luxury.
The holly was simply punched from lime green light weight card, using our large holly punch, and edge-tinted with VersaColor 'Tea Green' Add berries using a red marker and finished off with Glossy Accents. Alternatively you could use small red gemstones.  
This card uses our 16mm red grosgrain ribbon, bows are not always necessary, with some of the wider ribbons a knot can be just as effective and much easier!
Here we used our red satin 'baby ribbon', it's a small card and so the delicate baby ribbon suites it perfectly.

Or just keep the cards simple by mounting the images onto coloured card.

We've kept the outlines very simple so there's no fiddly cutting out.

Click on the sheets below to open full size then save.


Finally - here are links to three wonderful sites with information on our beautiful native Robin:
RSPB - Robins
BBC Wildlife - The secret life of the robin leaving the nest
Arkwildlife - Robin

Thanks for visiting and have fun!