Monday 31 January 2011

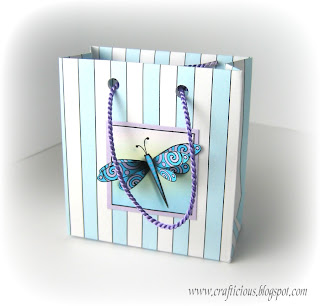
Small Gift Bag Template & Tutorial

I love working with boxes, bags and packaging.
This gift bag will hold a small present,
candy or jewelry would be perfect.
There's a downloadable template at the end of this post

The bag measurements are:
90mm (3.5") high x 85mm (3.3") wide x 40mm (1.5") deep

CLICK ON IMAGE FOR A CLOSER VIEW

You will need; 
One A4 sheet of paper.
Glue
Two lengths of ribbon or cord.

If you are using a printable backing paper:
Print the paper.
 Flip the sheet over & return it to your printer.
Print the template on the reverse.

Making the bag:
Cut out and score along the dotted score lines.
Set the folds by folding them forward & backward
so the folds will work both ways (mountain & valley).

'Setting' the base folds
1) Pinch the diagonal, base folds
2) on the reverse - fold them in and press
3) open out, turn the paper over,
repeat the folds on the pattern side

Bag top
4) open the paper and fold the top back
5) turn the paper over and use the guides
to punch holes through the two layers

Bag sides
6) Fold the top flap back to the inside
and fold the sides as shown above.
7) Glue along the inside of side flap a

8) the glued side a slots over side b as shown above
9) Flatten the bag to make sure the sides are glued
together in the correct position.

Base fold
10) Bring the base up (there is a score line to help)
and place a finger on the outside base
11) pushing the inside folds down & pulling
the edges c upwards
12) Flatten edges c inwards & d outwards

13) Apply glue to the first flap and
press into position as shown
14)  Apply glue to the second flap
15) and position it over the first.

16) A crease is visible at the base of one side of the bag
17) but not on the other.

 Thread cord or ribbon through the punched holes, 
on either side of the bag, and tie inside to fix them

Download Sheet One
Small Gift Bag
click on image & open fully before saving
 Below is an extra sheet.
I have sized the decoupage down and included
some blank circle sentiments tags
so you can stamp a message of your choice.

Download Sheet Two
Blank Tags, Small Butterflies & Dragonflies
click on image & open fully before saving

Thank you for taking the time to visit.
X


Friday 28 January 2011

Circle Sentiments Tags & Boarder Ribbons

Here are the 'circle sentiments' and 'boarder ribbons' sheets

Free Download Sheet
'Circle Sentiments Tags'
click on image & open fully before saving

 I've given the tags a large colour boarder
so they can be punched out easily.


Here I've used the 'Stampin Up' scallop circle punch.


Turn the punch upside down to line up with
the centre of the tag then punch.
Simples!
This will work with circle pinches too.

Free Download Sheet
'Boarder Ribbons'
click on image & open fully before saving
I have more sheets to come from this set.
Got a little bit carried away I think,
but I enjoyed it.

Still to come:
Alphabet sheets.
Small gift bag template.

Thanks for popping by.
Back to the drawing board and I'll be back soon!
X

Wednesday 26 January 2011

Backing Papers - 'Butterflies & Dragonflies' Set

Here are the backing papers from my
'Butterflies & Dragonflies' set.

'Bold Dots' Backing Paper - Free Download
click on image & open fully before saving

'Bold Stripes' Backing Paper - Free Download
click on image & open fully before saving

I'll be back soon with the 'ribbon boarders' & 'sentiments tags'!
Have fun and thanks for visiting.
X

Monday 24 January 2011

'Butterflies & Dragonflies' Free Decoupage Sheet

These cards were made using my
 'Butterflies & Dragonflies' Decoupage set.
There is a free download sheet at the end of this post.

CLICK ON IMAGES FOR A CLOSER VIEW

They are much brighter than they look in the photograph,
London is quite cloudy right now,
so the images are little bit 'grey'.
Oh roll on summer!


The 'Thinking of You' sentiment is
a Paula Pascual stamp - 'Big Sentiments'
I love Paula's stamps!
Stamped using VersaFine Onyx Black.


The  'Thank You' sentiment is my design.
I'll be loading the sheet for this later in the week.


DOWNLOAD SHEET 
'Butterflies & Dragonflies' Decoupage.
click on image to open fully before saving
I have backing papers, boarder ribbons and
sentiments that I will post through the week.

Thanks for popping by,
Elaine x

Sunday 23 January 2011

Butterfly Decoupage Card

OK humour me.
I'm really enjoying digital drawing at the moment.
This is a card I've made from a 'Butterflies & Dragonflies'
decoupage paper I've just designed.

CLICK ON IMAGES FOR A CLOSER VIEW

I've designed a whole set including backing papers,
ribbon boarders and sentiments tags.


I'm just putting the finishing touches to the sheets and
will be posting them through the week.

Hope you'll have fun with them

If you haven't discovered Curt's wonderful blog yet
 it's a must go visit!
He is sooo talented and has the best sense of humour.
Have a look at his latest cards, they're fabulous (as always)
and he's used a quote and chocolate from my last download sheets.
You would think they were made for his card!
Here's the link: Curt's World

Thanks for popping by and Ill be back soon!
X

Thursday 20 January 2011

Chocolate Themed Cards

Here are a couple of cards I made using the sheets
in my previous 'chocolate' posts.
CLICK ON IMAGES FOR A CLOSER VIEW
 With this card I simply printed off the decoupage sheet.
Cut out the chocolates and decoupaged them on top
using 3mm foam pads.
The message is from the same sheet - cut out
and glued into the centre of the card.

 I printed the decoupage sheet twice, once onto beige card stock
this is the base, and again onto ivory card stock - the layered
chocolates and message.

For this card I used the 'Chocolates', 'Chocolate Bar Alphabet'
sheets & striped backing paper.
I stamped a flourish over the backing paper.

 I cut out the large heart and decoupaged the small heart on
top using 3mm foam pads.
I dotted the centre with 'Rainbow Antraciet' & 'Brown' glitter.

I've only just discovered this glitter and I love it.
It's Kars glitter which I bought from cardcraft-uk
There are some fabulous colours and the sparkle is subtle.
Great for adding texture without the full on glitz.
Just a note - the bottle has a fine nozzle which I removed,
it's not necessary and  it prevents you from returning the
surplus glitter to the bottle.

Thank you for taking the time to visit.
X


Saturday 15 January 2011

'Chocolates' Decoupage Sheet

Had to slip a quick decoupage sheet in!

'Chocolates' Decoupage Sheet
click on image to open fully before saving

The centre frame is blank so you can
decoupage one of the quotes or
stamp a message of your choice.


Thanks for visiting
& hope to see you again soon.
X

Friday 14 January 2011

'Chocolate' Words & Backing Papers.

Add these sheets to the downloads in my previous
two posts and you will have a complete set.

'Chocolate Quotes' Free Download
click on image to open fully before saving

I've colour co-ordinated all of the sheets so
they will work together.

'Scratch' Backing Paper Free download
click on image to open fully before saving

Check out the links at the end of this post.
There are some funny and amazing facts about chocolate.

'Dots' Backing Paper Free Download
click on image to open fully before saving

'Chocolate Words' Backing Paper
Click on image to open fully before saving 

Great links to all things chocolate:
- fab quotes, jokes and information.
- quotes, recipes & lots more.
- from the 'QI' TV gang, amazing facts about chocolate.
- lots more fun facts

We all know too much of anything is bad for you.
Did you know that 22lb (40 bars of Dairy Milk)
is the lethal dose for human beings?!

Ending on a more positive note:
Chocolate is rich in anti-oxidants, which reduces
the risk of heart disease and cancer and it doesn't
cause acne.

Thanks for popping by and make sure you don't 
eat more than 39 bars of Dairy Milk in one go.
Hugs
X

Tuesday 11 January 2011

Valentine 'Chocolate Bar' Alphabet

I'm back, with more chocolate!

'Chocolate Bar' Alphabet
click on image & open fully before saving
I've piped some in light and some in dark chocolate
so you have a choice.
Alternatively,
you can just go completely wild
and use both!

Back soon,
X

Monday 10 January 2011

'Valentine Chocolates' - Free Downloads

Valentine's Day is just around the corner
and I've been making chocolates.
No calories though because they're virtual.

'Chocolates' Download Sheet One A
click on image & open fully before saving
If you have saved the above sheet before - this one is
amended so is slightly different.
The earlier one slipped through quality control...
...can't get the staff these days!

I've had so much fun making these that I've decided it's chocolate week on crafticious.
There will be more sheets coming including 'alphabet Buttons',

'chocolate words' and some samples along the way.

'Chocolates' Backing Paper Sheet One
click on image & open fully before saving

Thanks for popping by and I'll be back soon.
Have fun!
X

Thursday 6 January 2011

Pop Up Exploding Cube Card Tutorial

CLICK ON IMAGES FOR A CLOSER VIEW

This card folds completely flat and fits inside a half A4 envelope.
There are two sheets to download at the end of this post.
The first is a template for the pop up cube base.
The second is a positioning & cutting guide
for an A5 acetate sheet.

To make this card you will need:
one A4 sheet of card for the cube base
one A5 sheet of acetate for the centre pop and acetate strips
(Strong acetate is needed for this project I buy mine from
Joanna Sheen or use recycled packaging where possible).
one A4 sheet of paper for the positioning & cutout guide
Numbers, stars & sentiments tag from the download in my previous post
Hole punch, jump ring, glue, scissors, sticky tape, craft knife,
metal rule and cutting mat.


Print the first download sheet (at the end of this post)
onto an A4 sheet of card.
After cutting out you will have 11 pieces as shown above.


1) Piece A - score along the dotted lines and fold into a cube.
2) Piece B - score along the dotted line, fold and glue inside the open corner of  A to lock the cube together. 


3) Score and fold piece C as shown above.
4) Glue into position in the centre of the cube
as shown in the diagram.


Print download sheet two, at the end of this post,
onto an A4 sheet of paper.
This is a positioning and cutting guide for the centre pop up.
Position an A5 sheet of acetate over the top of the guide.
Cut out the numbers (from the download sheet in my previous post) and glue them onto the acetate,
following the printed guide which shows clearly through the acetate.
Cut out along the red lines.
The base of your acetate cut-out has a slit forming two flaps A & B
Glue flap A onto the front of the centre strip (piece C) in your cube
and flap B onto the back of your centre strip (piece C).
The centre strip is visible in the image below - number (3)


Here's a photograph looking down on the cube card.
Cut out the stars you want to use in the explosion and glue each one onto a strip of acetate about 5mm wide
and no longer than 16mm.
These can be attached to the inside front, back & sides of the cube.
Vary the heights & angles to make the explosion more interesting.
When you have finished glue the inside panels D to K to the insides of the cube.
They cover and anchor your centre acetate (flaps A & B)
 and all of the acetate strip (stars) ends.
(1) in the above image shows the acetate fixings uncovered
(2) shows after a panel has been glued to the inside cube.


note: before you finally anchor the acetate 'star' strips
close the cube card to check they don't over-run the envelope dimensions.

The sentiments tag is attached to the cut out centre of the zero
using a jump ring,
There are hole punch guides marked out for you.

Download Sheet One - Pop Up Cube
click on image to open fully before saving

Download Sheet Two -
Acetate Positioning & Cut Out Guide
click on image to open fully before saving
I'll be developing this idea over the next few weeks
so there will be more projects to come.


I know it doesn't look it but this is a very simple pop up.
I hope I haven't made the instructions too complicated.
X