Thursday, 19 November 2009

Gift Box Template - 'Snowflake'

his hexagonal gift box measures 45mm high x 85mm wide
(1 3/4" high x 3 3/8"wide)
There's a free downloadable template at the end of this post.

CLICK ON IMAGES FOR A CLOSER VIEW

I used Stampin-Up card - 'Almost Amethyst' it's one of my favourite colours.
I printed directly onto the card (the template sheets are drawn in grey so the lines are not too heavy).
I cut out using a craft knife and made sure that the printed lines went to the inside of the box when gluing it together.

The stamp was a snowflake.
Stamped using VersaMark and embossed with 'Sea-foam White' powder.
I added a few crystal glitter accents and some flat backed pearls.

To finish I ran a Brilliance ink pad - 'Moonlight White' round the edges and sponged across the lid sides. 


- Hexagonal Gift Box Template -
Click on the images to open full size then save.
These sheets are set to print grey so the lines are not too prominent if you print directly onto your chosen card stock.
They appear very faint but will print OK.

- Box & Lid Liner, Lid Mount & Gift Card -
This second sheet is optional but the liners finish the box off nicely by hiding the glue flaps inside the box and lid.


Thanks for popping by
Elaine

Monday, 16 November 2009

Pop Up Christmas Card - 'Snowmen'

This card was made using exactly the same process explained in our earlier post - 'Pop Up Card Tutorial'.

CLICK ON IMAGES FOR A CLOSER VIEW
Instead of using the decoupage sheets 'Presents' I stamped and cut out two snowmen  - ('Funstamps - Snowman' wood mounted stamp).

I've had this stamp for at least a couple of years but this is the first time I've actually used it. How bad is that!


The snowmen were stamped using VersaFine Onyx Black then coloured using watercolour pencils and a blending pen.
The background is chalked then stamped over with a small snowflake stamp. I stamped in VersaMark and used 'Seafoam White' embossing powder.
To finish I added crystal glitter highlights.

I doodled the 'snow ball mountain' and the snowmen are juggling doodled snowballs mounted onto the tips of acetate strips so it looks like they're in mid air.


I wanted the second snowman to reach out from the card and his arm to be in a different position to the original stamp.
Masking off didn't work so here's what I did:

- Changing a stamped image -
1.  Stamped the snowman twice. Cut out the second - I used this later, to trace round (4).
2.  Pencilled in the shape I wanted the second snowman's body to be.
3.  Inked over the pencil, dotting inside my inked line (to match the style of the stamp's lines).
4.  Placed the cut out snowman, from earlier, where I wanted the second hand to be.
5.  Pencilled round the arm and hand.
6.  Worked over the pencil lines as before.
7.   Finally I cut out the amended snowman.
8.  The variation on the original stamp.


Hope you have a go and thanks for visiting!
X


Tuesday, 10 November 2009

Free Download - Xmas Card Pop Up Tutorial

Here is a tutorial for a simple pop-up Christmas card, based on a half A4 tent fold card blank.
There are free downloadable sheets at the end of the post.

CLICK ON IMAGES FOR A CLOSER LOOK
We've used our stamp - Hero Arts 'Leaf Flourish', stamped using VersaFine Onyx black.
EJ Craft Designs
The present is attached  onto a stamped panel using small 3D foam pads and then to a silver mirror board mount using double sided tape.

The base card has been stamped again, inside, using VersFine Onyx black with a few crystal glitter highlights to finish.


The presents are attached using folded strips of card - more details below.


Here we've stamped with VersaMark and embossed with our 'Silver Dollar' embossing powder.


The presents and tag were printed onto silver metallic adhesive foil.
The make of this fab film is 'print IT'


After printing leave to dry for at least 15 minutes.
Roughly cut out the pieces you need.
Peel off the backing.
Stick them to matching colour card.
Cut out as you would normally.


- POP UP TUTORIAL -
From the downloaded sheets cut one large and one small present.
You will also need to cut a tag.

To attach the presents to the inside:
Cut two strips of card:
1) 40mm high by 100mm wide (just under 4" x 1 & 9/16")
2) 20mm high by 80mm wide (3/4" x 3 & 1/8")


Fold each in half and in half again making quarter folds.
Form the strips into cubes so the folds work in the correct direction.
Open them flat and apply tape to three of the four quarters as shown above.


Fold each strip back in half with the two sections that are taped facing you.


With the two quarters that are taped facing you, attach the large present (face up) to the large tag.
A) Attach it close to the tag fold but not covering it.
B) the untaped section is visible on the reverse
Attach the small present to the smaller tag in the same way.


Printed side facing you, attach the small present to the large present -
C) lining up the base of the tag to the base of the large present.


Before removing the double sided tape backing from your tag
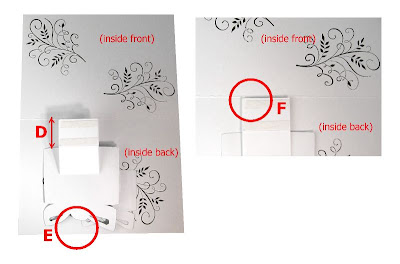
Open your card and position the presents -
line up the edge of the large present tag to the card centre fold (D & F)
Check that the top of the present doesn't run over the edge of the card (E)
If it does trim the end of the tag (F) until it fits.
Remove the tape backing and place in position.


Close the card, making sure that the presents remain in position.
Press firmly across the front of the card then open - the presents will pop up and forward.


The tag:

Cut a strip of card narrower than the tag and almost twice it's length.
Fold in half and apply double sided tape to both sides
Attach to the back of the tag.


Position and fix the tag to your card whilst the card is open.

FINISHED!


- DOWNLOAD SHEETS -Click on the images (this will open them to full size) then save.
They will need to be printed in 'Landscape'.


Have Fun!

Elaine